

Sewer Hose Storage
This post contains unaffiliated links, No Bull has no financial partnership with any companies/brands mentioned therein.
Behold the necessary evil that is emptying your black and gray tanks! (Dirty Jobs could’ve done a whole episode)
The main thing you never want to do is just let your sewer hose flop about your storage willy-nilly. That’s a great way to get different infections and parasites from sewage ending up on other things in the compartment, and leaking water (or other liquids) can cause rust and mold.
Instead, contain your sewer hose! The most common option being a designated sealed bin. Some RVs have a hollow rear bumper which can be great to keep the sewer hose as it allows for ventilation, we’ll go into more specifics below. There’s even a few rigs with a built-in sewer hose compartment (but they don’t fit all hoses, just a heads up)!
Now you don’t need a million hoses for your RV, but depending on the location of a dump station and just where the outlet is for your tanks you may need more than a 5 or 10 foot hose. If you’re staying at a campsite with sewer connections at your lot, you may need to connect two or three hoses to reach the hook-up, depending on the site. A bit of research (maybe a call to the camp) will help you figure out what you need.
Rule of thumb…
One access point for gray and black: Start out with a 10-ft hose and an elbow connection to let you connect to sewer hookups at camp.
Separate access points for gray and black: You’ll need two hoses off the bat. You can also purchase a Y-connector to connect those hoses to dump them at the same time if you have sewer connections at your campsite.
Whatever you do NEVER connect gray or black designated hoses to fresh water outlets EVER!
So here are our recommendations for hose storage to aid sanitation and sanity.
1. Plastic bins with tight seal lids
Contain odor and any leaking water inside. Grab a container that will easily fit inside your outdoor storage compartment. Clear bins can help you see what’s inside, making it easier to find what you need (but a good, clear label is also helpful). This method does take up more storage space than some of the “straight and narrow” versions below, but has the benefit of being able to store more than one hose at a time.
2. Magnetic Bumper Caps
For a hollow rear bumper (which is not on every RV) they are great to store a hose. RV bumpers come with caps, but they can be switched out for magnetic ones that won’t fall off when driving. They also allow for ventilation to tamp down on smell, you can drill a few holes to aid this and allow any water to drain.
This method is a bit controversial due to the possibility of storing a wet hose causing rust…but I don’t know many who would store a dripping wet hose anyway, so use your best judgment.

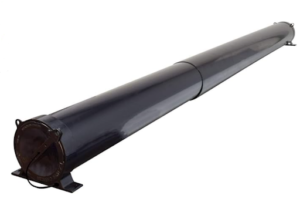
3. A DIY Hose Storage Made from PVC Pipe
So if you don’t have a hollow bumper, you can make a similar set-up on your own. Get a PVC pipe with a diameter larger than your hose and be sure it can fit inside your storage bay, capping each end making it easy to store your hose and locate it. Some people go the extra mile of attaching this pipe to the wall of the compartment with clamps or straps, or even the underside of their trailer.
If DIY isn’t your thing, you can also purchase hose carriers online and in some stores. The Valterra RV Adjustable Hose Carrier on Amazon is one example:
Other options include:
- 5-gallon bucket with a lid, easily purchased at any home hardware store
- Bumper mounted storage box
- Under-chassis mounted storage bin
- Waterproof hose bag
- Heavy duty garbage bag (although this is best as a temporary solution and last ditch save)
Cleaning Tips
Unless you want sewage sitting in your hose, here are a few ways to help flush it out (no pun intended) between sewage dumps. The best way to keep your hose stored in between trips is to clean it out with your garden hose. If you need it, a lot of dump stations will have a water hose handy and some RVs even have a black tank flush that will use water from your fresh water tank to rinse your black tanks and your hose on its way out.
But those are the more complicated, long term storage options. And while you need to clean your sewer hose after every use, those may not be available. So whenever you’re emptying your back tank, do it before emptying your gray tank. Running the gray tank water (which comes from your sinks and shower, and therefore only has soap and water in it) through the hose afterwards helps clean it out. So it might not be sparkling, but it can definitely help clear out the gunk and grime.
No Bull Tip! Keep either a set of work gloves, or a box of rubber gloves near your sewer hose for dumping to keep your hands clean! A package of antibacterial hand wipes never hurts too.
Sanitary sewer hose storage is not just a recommendation, it’s a necessity. Beyond staying clean, it will help you stay healthy. If you want an example of what kind of sewer related issues can come about from that sort of thing, you need only look at the E.Coli outbreak in Calgary in the fall of 2023.
Have you tried any other sewer hose storage hacks that we forgot?