

How to Level Your RV
If you’re on this page, you already know the value of an RV: all the amenities of home with the brilliance of the wilderness. Toilet, shower, a fridge, a bed. But with great power comes great responsibility and you need to care of your home on wheels the same as you would your brick and mortar.
Why Level at All?
Did you know that appliances in your RV can be seriously affected by use on uneven terrain? And I’m not talking about things falling out of your fridge, I mean that they can stall out and stop working if sitting at an angle. This means spoiled food or possibly a broken appliance, then you’re sh- outta luck.
It can also throw off your water tank sensors, for example giving you false readings on how much fresh water you have – an absolute essential if you aren’t hooked up to any park lines.
Gear:
- Bubble leveler/architect level: why rely on your eye when you can have a tool to be totally sure
- Wheel chocks
- Leveling blocks (some use scraps of wood, but there are several different type of blocks/levels on the market including some that fit together like Lego)
- Stand for tongue jack and/or stabilizers – you can also use leveling blocks for this
Do you need leveling blocks?
Short answer: Yes
Long answer: Still yes. Even the most well-maintained, luxury campsite can have sloped sites where your jacks won’t extend enough to get you level, or you’ll be on soft ground that built-in jacks will sink in thus making true leveling impossible.

Blocks serve two purposes: Adding height for extremely uneven ground, and increasing surface area to prevent sinking.
How many blocks do you need?
Sadly there is no absolute number because it will depend on every site, sometimes you need one, maybe two. But if you find yourself needing more than that, you may want to reposition your RV to find a more level spot.
Top Tips!
- Start as close to level as you can when parking, this will mean less work to set-up. Choose as flat and level a spot as possible and clear it of gear and debris (and humans).
- Don’t unhook your trailer before leveling! We’ll go into more depth later.
- Park with the front of your RV facing downward if you’re on a slope. Your rear wheels lock when in park you want to keep them grounded. If the front of your RV is on the lower end of any slope, you’ll be able to lift them as you level.
- Always use blocks or jack pads! Even on pavement, asphalt can soften in hot enough weather and your jacks will sink.
- Avoid leveling on slick or icy surfaces if you can. Setting up on slippery surfaces can lead to your jacks slipping out of place and damage them, as well as lead to dangerous scenarios.
Follow manufacturer recommendations for your specific camper if possible. We’re going through common/general steps, but sometimes your rig will have specifications you’ll want to take as law to avoid damage.
Leveling Slide Units
Rule of thumb: Don’t extend any slides before your RV is secured in place/leveled properly. This is after you’re balanced, blocked, chocked and secure.
But, there are exceptions, in this case auto-leveling systems. Some models (and you’ll check manufacturer directions first) calibrate with slides out.
Auto-leveling systems are basically the cheat code to leveling. 99.99% of the time you press a button and everything adjusts itself (remember: the RV owner’s manual will let you know if you need to extend the slides first or not).
Motorhomes B or C:
- Park with your front wheels on the lower end of any incline
- Check how level your RV is to start using a bubble level placed as close to the middle inside of your rig as possible
- You’ll level front-back and right-left at the same time, so once you’ve determined how off balance you are you can set your blocks in place and drive your RV up onto them before rechecking your balance.
Placing blocks:
- To level front to back, you’ll need to raise both tires on the front or back (front is preferable)
- To level right to left, you’ll have to raise both right or left side wheels, whichever is lower
- If you’re off on both, you may be able to adjust the wheel that is low by both measurements or you may want to readjust your parking position
Travel Trailer (Towables)
Towable RVs are leveled in stages, while you’ll still measure the same as you do in a motorhome (bubble leveler in the center) you first start with your right-left balance.
- Adjust left-right with blocks under your tires (whichever side is lower). It’s generally easier to pull your trailer forward onto the blocks, but if it’s easier for you to back up at your angle that’s just fine!
- After confirming your left-right balance, chock BOTH your left and right tires. You absolute MUST do this before unhitching from your tow vehicle, it is non-negotiable unless you want your trailer rolling away
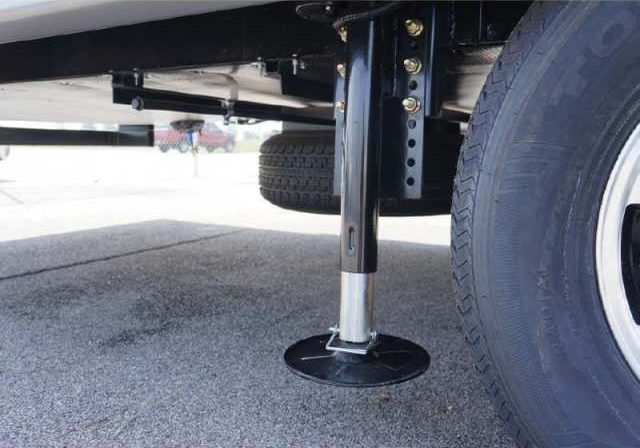
- With your trailer secured, take your front-back measure. Instead of rolling onto blocks this balance is adjusted with the A-frame/landing jack onto blocks to perfect your balance.
- Last step is lowering your stabilizers, checking for even pressure all around and extending any slides.
No Bull Tip! If part of a tire hangs off the leveling block your tire will weaken over time, adjust your camper so all your tires are solidly on their blocks.